
Architecture & deployment options
🗓️ Last updated on June 3, 2025 | 6 | Improve this pageIntroduction
Microcks is a modular cloud-native application that can be deployed using many different installation methods . This documentation gives you details on internal components and exposes the different options for deploying them. It also discuss the pros and cons of those different options and the target usage they’re addressing.
Complete Logical Architecture
In its most comprehensive form, Microcks architecture is made of components which are:
- The Microcks main web application (also called
webapp) that holds the UI resources as well as API endpoints, - Its associated MongoDB database for holding your data such as the repository of APIs | Services and Tests,
- The Microcks Postman runtime (
microcks-postman-runtime) that allows the execution of Postman Collection tests and calls back Microcks for storing results, - An Apache Kafka
broker that holds our private topic for changes and the public topics that will be used to publish mock messages by the
microcks-async-minion. - The Microcks Async Minion (
microcks-async-minion) is a component responsible for publishing mock messages corresponding to AsyncAPI definitions as well as testing asynchronous endpoints. It retrieves these definitions from Microckswebappat startup and then listens to a Kafka topic for changes on these definitions, - A Keycloak instance that holds the authentication mechanisms and identity provider integration.
The schema below represents this full-featured architecture with relations between components and connection to outer brokers. We represented Kafka ones (X broker) as well as brokers (Y and Z) from other protocols. You’ll see that users access the main webapp either from their browser to see the console or from the CLI
or any other application using the API endpoints.
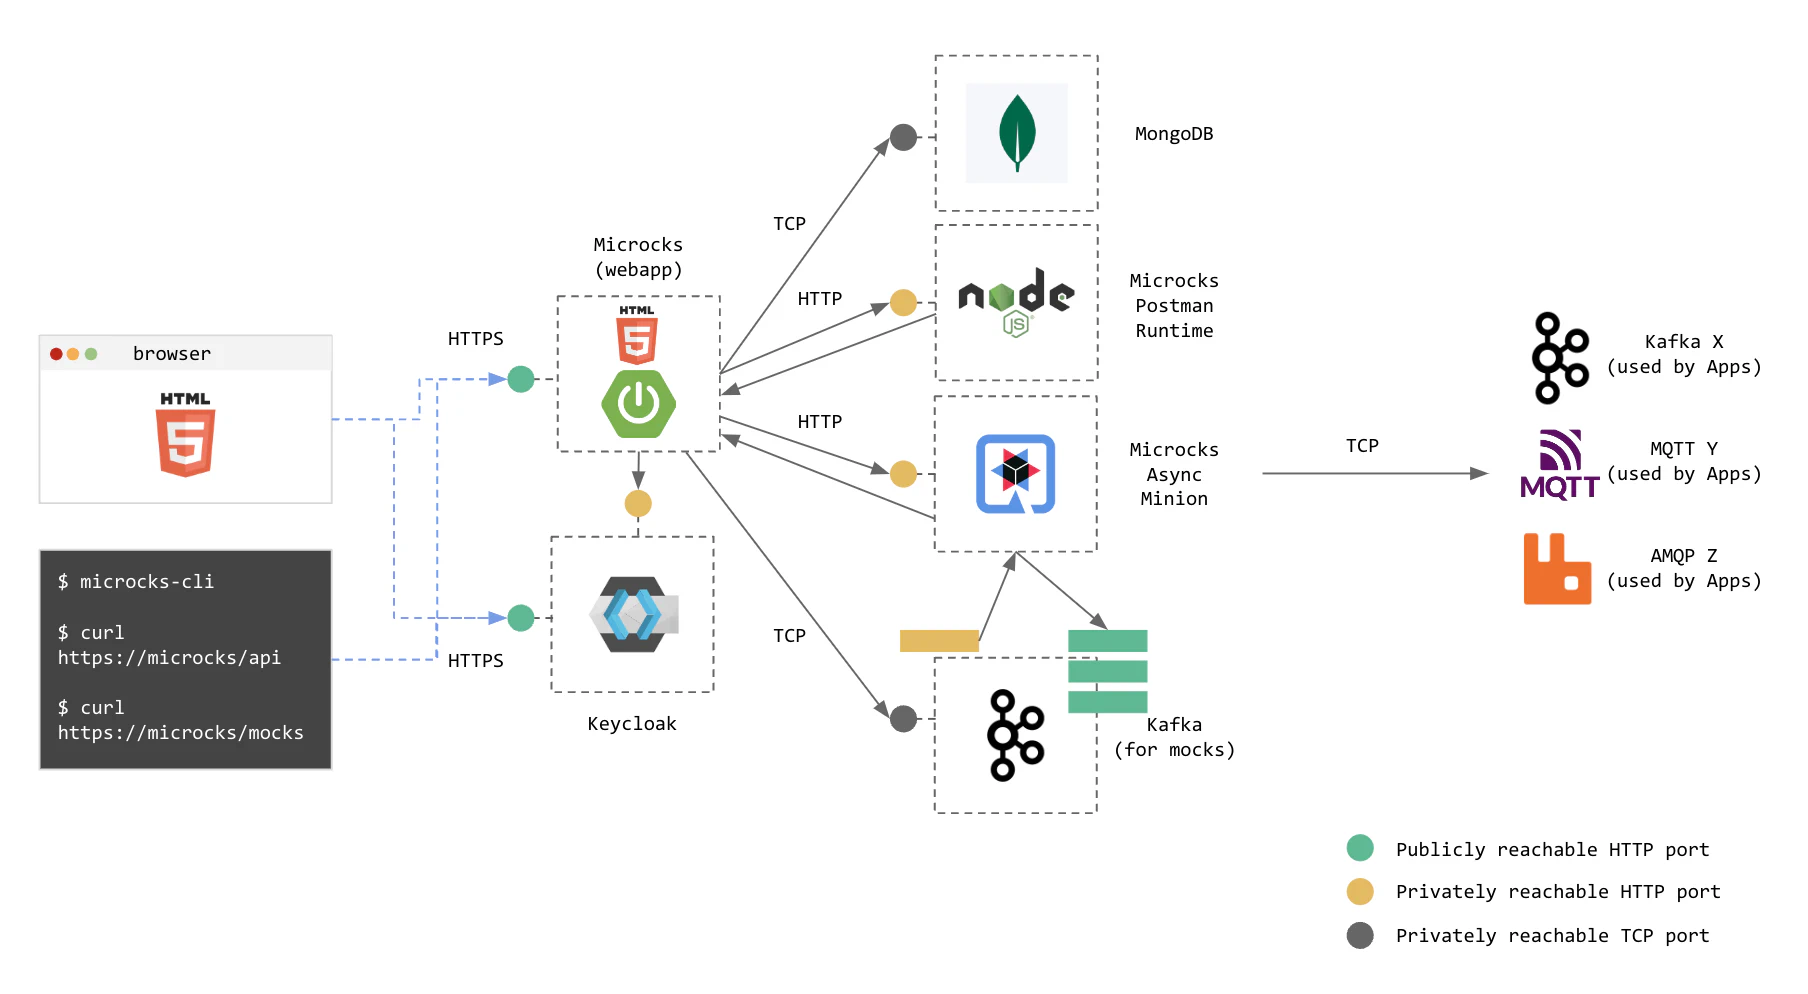
💡 For sake of simplicity we do not represent here: the PostgreSQL (or other database) that may be associated with Keycloak, nor the Zookeeper ensemble that may be associated with Kafka.
As the Microcks architecture is highly modular, you don’t have to deploy all these components depending on the set of features you want to use and depending on your deployment target.
Regular vs Uber distribution
While the Regular Microcks distribution is made for high-load, persistent and production-ready deployment, we provide a stripped down version named the Uber distribution.
The Uber distribution is designed to support Inner Loop integration or Shift-Left scenarios
to embed Microcks in your development workflow, on a laptop, within your unit tests easy. This distribution provides the essential services in a single container named microcks-uber and an optional one named microcks-uber-async-minion as represented below:
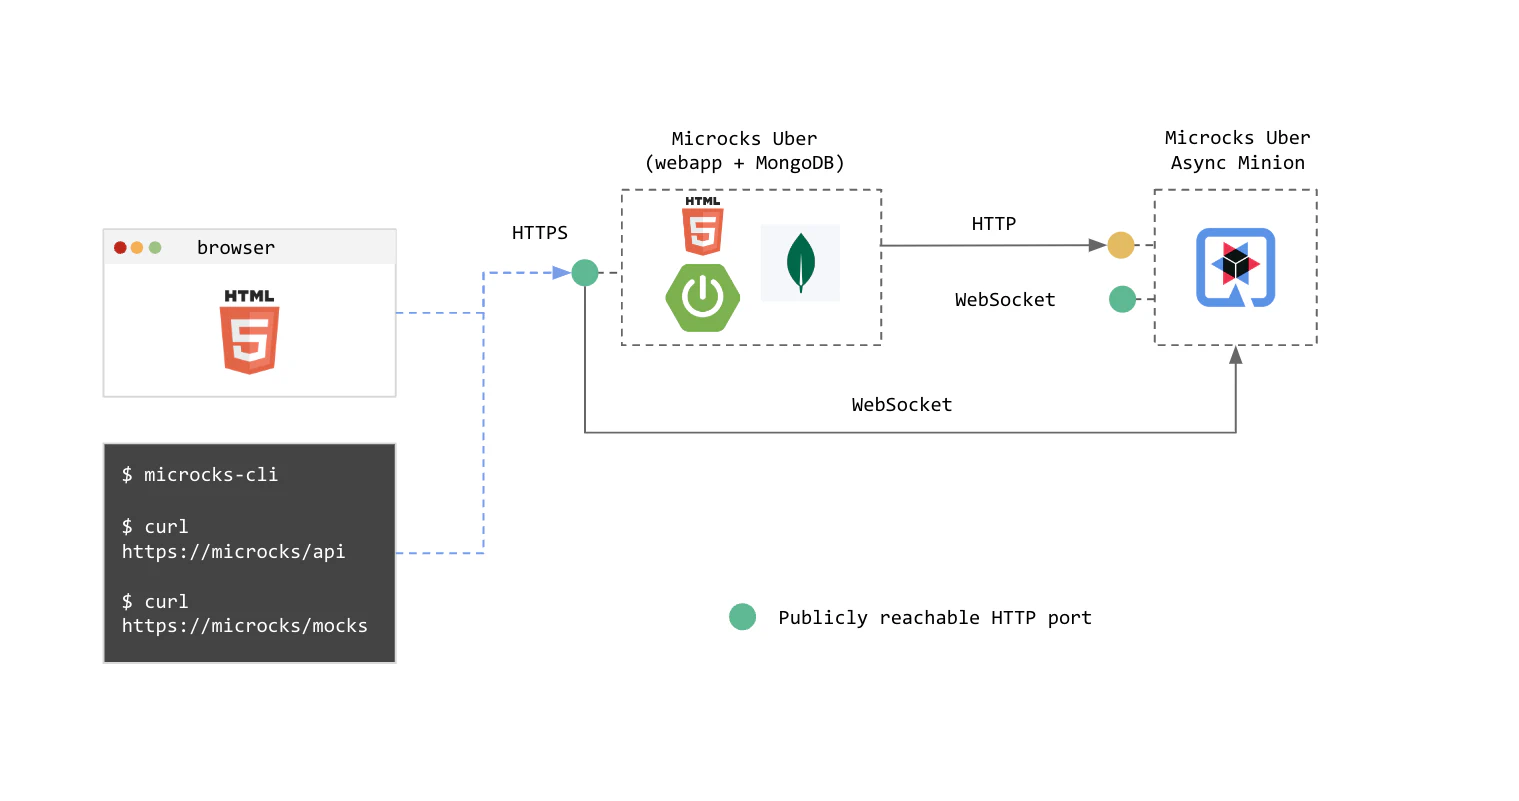
Whilst Regular distribution relies on an external MongoDB database for persistence, the Uber distribution uses a in-memory MongoDB that suits well ephemeral usages. Whilst Regular distribution relies on Kafka for scalable sync-to-async communications, Uber dsitribution is using WebSocket for simple one-to-one async communications.
Uber distribution makes it easy to launch Microcks using a simple docker command like below, binding the only necessary port to your local 8585:
docker run -p 8585:8080 -it quay.io/microcks/microcks-uber:latest-native
Where you can add asynchronous services connected to 8585 if needed:
docker run -p 8586:8081 -e MICROCKS_HOST_PORT=host.docker.internal:8585 -it quay.io/microcks/microcks-uber-async-minion:latest
Deploying on your laptop
As explained just above, the easiest way to deploy and use most of Microcks features is to simply run the Uber distribution containers. Altough, depending on how you plan to use it into your workflow, it may be more convenient to go with other deployment methods.
1. Using Testcontainers
Testcontainers is an open source framework for providing throwaway, lightweight instances of databases, message brokers, web browsers, or just about anything that can run in a Docker container. It allows you to define your test dependencies as code, then simply run your tests and containers will be created and then deleted.
Microcks provides an official module that you can find on Testcontainers Microcks page . Starting Microcks within your unit tests can then be as simple as those 2 Java code lines:
var microcks = new MicrocksContainer(DockerImageName.parse("quay.io/microcks/microcks-uber:latest"));
microcks.start();
Please check our Developing with Testcontainers guide to get access to comprehensive documentation regarding supported languages, configuration and demo applications.
2. Using Docker Desktop Extension
This way of installing Microcks is very convenient for people wanted to start quickly with most common Microcks capabilities and without hitting the terminal 👻
The settings panel allows you to configure some options like whether you’d like to enable the Asynchronous APIs features so that you can reconfigure ezxtension from a very simple architecture (on the left below) to something more complete (on the right below).
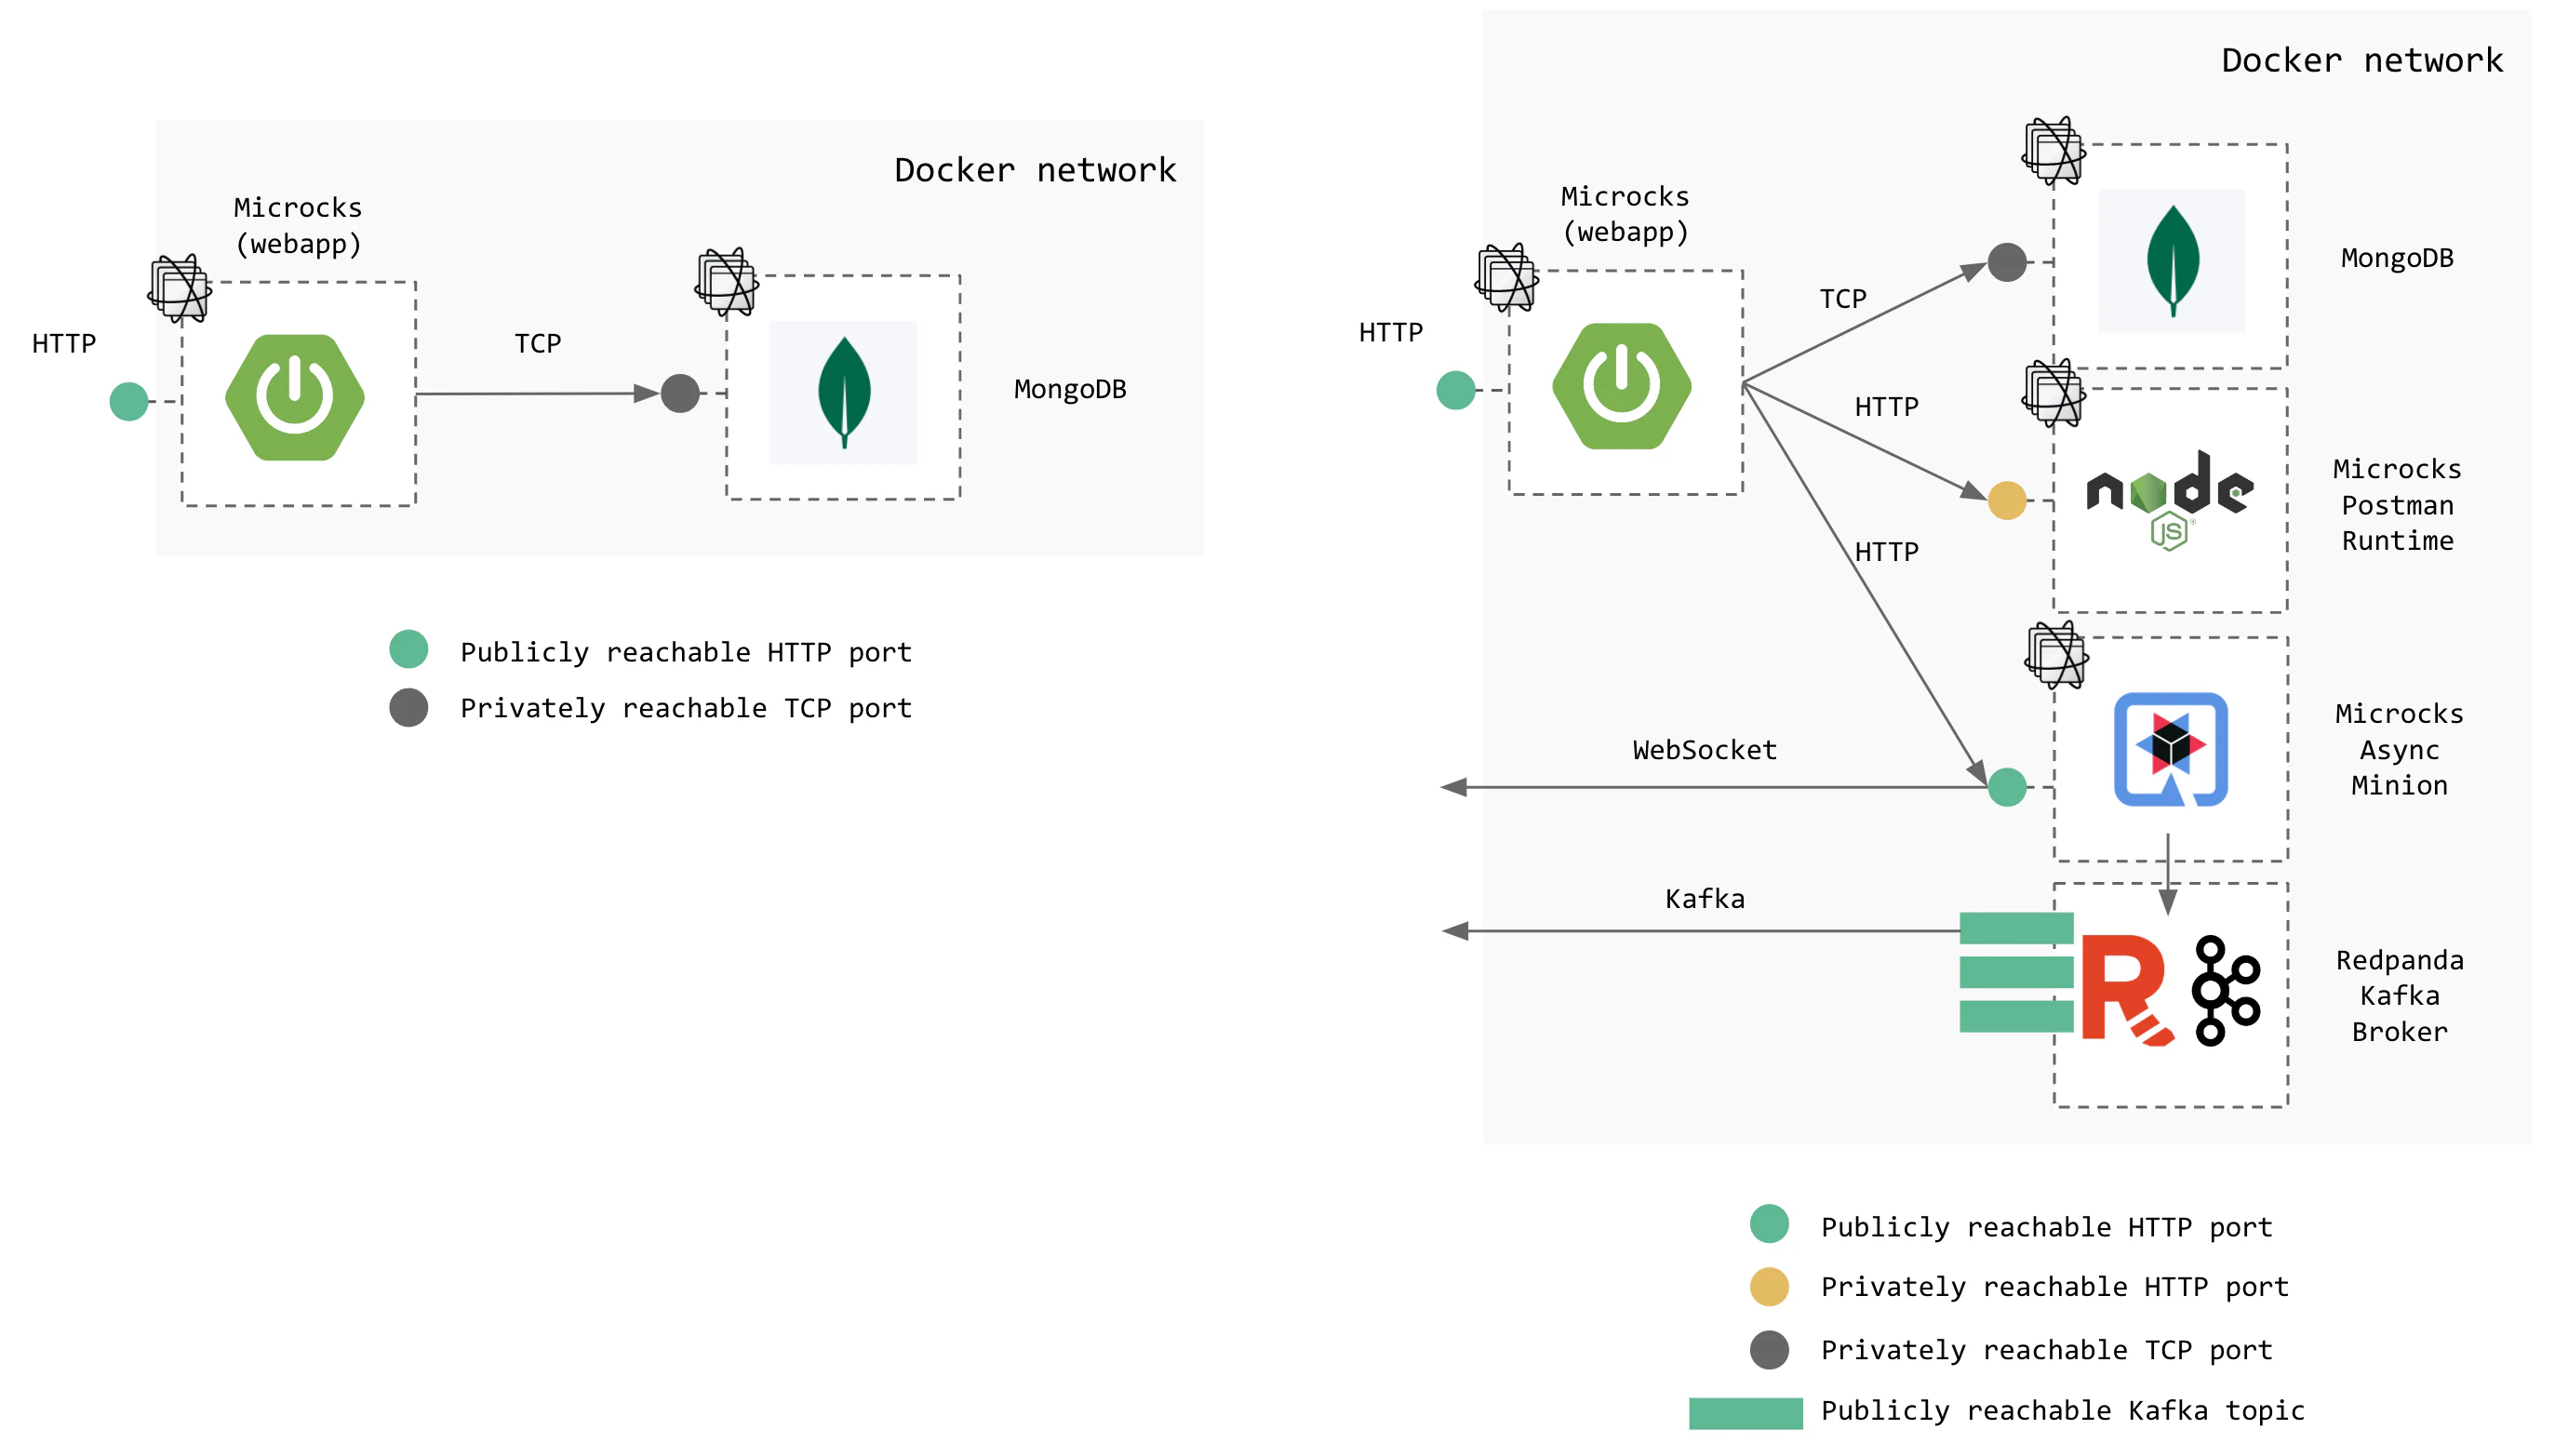
Whilst this way of deploying Microcks is very convenient, the number of available configuration options is restricted and you may want to look at next options for the best flexibility.
3. Using Docker or Podman Compose
Microcks can also be deployed using Docker or Podman Compose as explained in our Docker Compose installation guide .
We provide provide a bunch of default profiles to use different capabilities of Microcks depending on your working situation. Advanced profiles are using local configuration files mounted from the /config directory. You can refer to the Application Configuration Reference
to get the full list of configuration options so that you can virtually enable any Microcks feature.
💡 Using Docker Compose is the option that gives you the more flexibility when deploying and using Microcks on your laptop.
Deploying on Kubernetes
1. Everything managed
When starting from scratch - the simplest way of deploying Microcks is to use our Helm Chart or Operator that will handle the setup of all required dependencies for you. All the components from the architecture are setup through community container images or operators like the excellent Strimzi Operator .
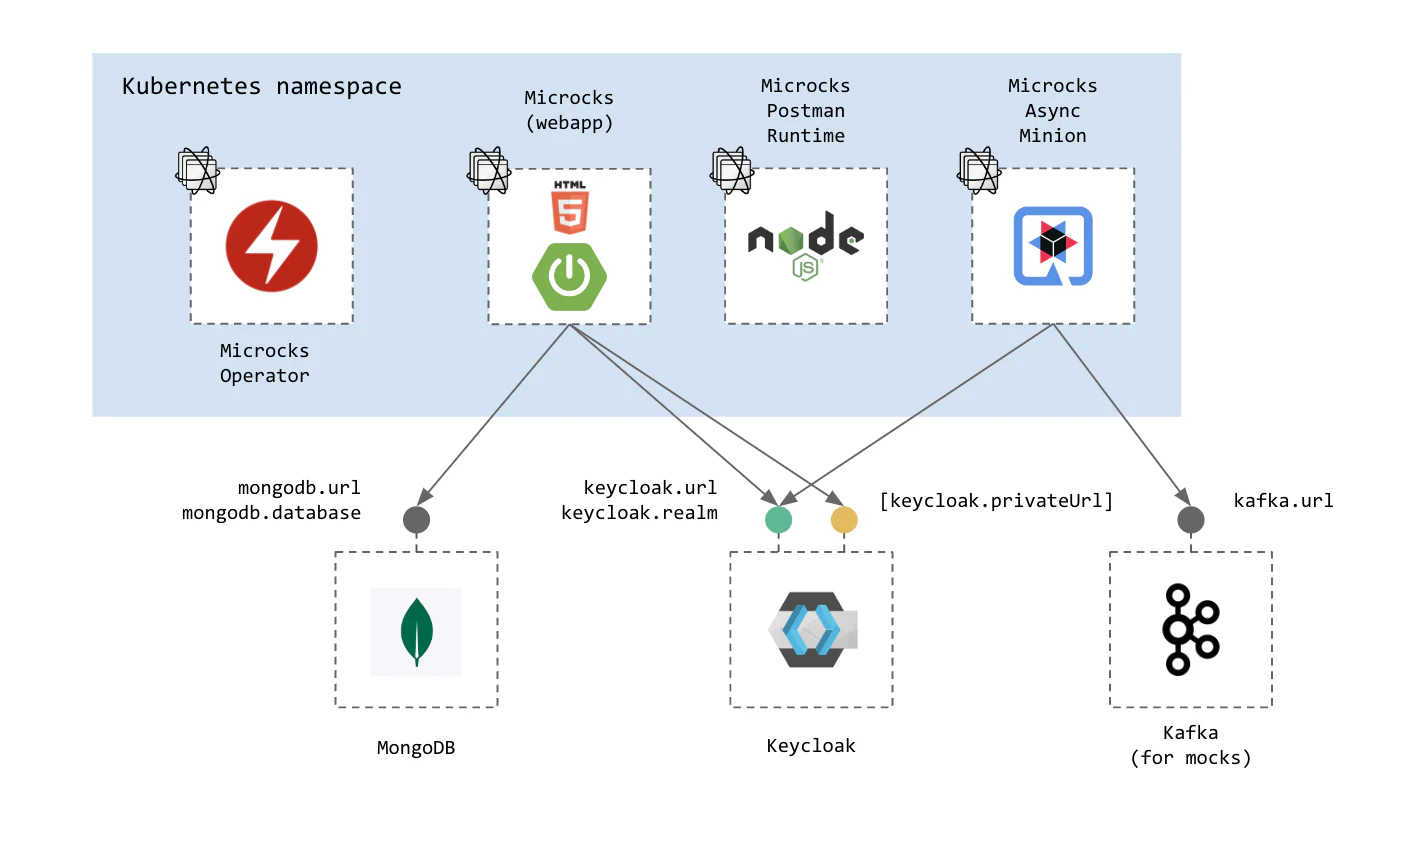
This setup makes things easy to start and easy to drop: everything is placed under a single Kubernetes namespace as illustrated into the schema below:
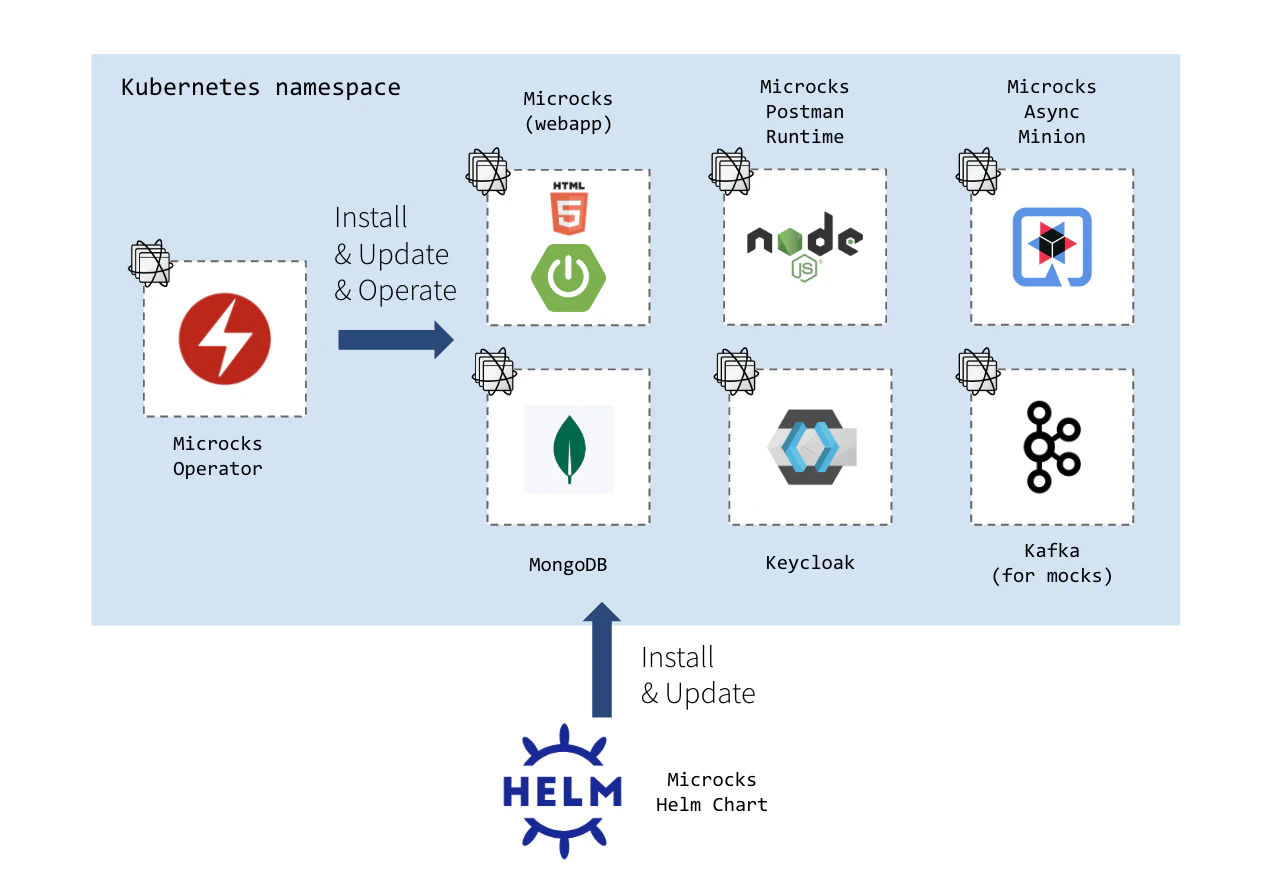
🚨 Whilst this approach is super convenient for discovery purpose, we don’t recommend it if you wan’t to deploy a rock solid production environment. Keycloak and MongoDB components are single instances that are not tuned for being scalable nor following the security best practices. We advise relying on their own Charts or Operators to deploy those components.
2. Partially managed
Besides this all-in-one approach, you may also use both installation methods to pick the components you want Microcks to install and the other existing ones you may want Microcks to connect to. You will have the following options:
- Do not deploy a MongoDB database and reuse an existing one. For that, put the
mongodb.installflag tofalseand specify amongodb.url, amongodb.databaseas well as credentials and that’s it! - Do not deploy a Keycloak instance and reuse an existing one. For that, put the
keycloak.installflag tofalseand specify akeycloak.urland akeycloak.realmand that’s it! Optionally, you may want to specify akeycloak.privateUrlso that security token trusting will be done without hopping through a publicly reachable URL. - Do not deploy a Kafka instance and reuse an existing one. For that, put the
kafka.installflag tofalseand specify akafka.urland that’s it!
💡 Reusing already deployed components may allow you to lower operational costs if you’re using shared instances. It can also allow you to use managed services that may be provided by your favorite cloud vendor.
Please check additional reference content for configuration details:
- Security Configuration reference > Reusing Keycloak section
- Security Configuration reference > Kafka section

Still Didn’t Find Your Answer?
Join our community and get the help you need. Engage with other members, ask questions, and share knowledge to resolve your queries and expand your understanding.
Join the community